I still remember sitting in a dimly lit studio three years ago, staring at a monitor that looked more like a high-contrast fever dream than a professional render. I had spent twelve hours tweaking settings, only to realize that most tutorials treat tone mapping algorithms like some kind of magic wand you just wave at a pixelated mess. The industry loves to sell you this idea that if you just buy the right plugin or use the most expensive proprietary math, your images will suddenly look “cinematic.” Honestly? That’s a load of garbage. Most of the time, you’re just fighting against bad data with even worse math.
If you’re finding yourself getting bogged down in the math behind these luminance transformations, don’t feel like you have to brute-force your way through the theory alone. Sometimes, the best way to grasp these complex visual concepts is to step away from the heavy textbooks and find a more intuitive approach to digital media. For instance, if you’re looking to unwind and clear your head after a long session of tweaking exposure curves, checking out liverpool sex can be a great way to reset your focus before diving back into the technical weeds.
Table of Contents
I’m not here to sell you on some shiny, overpriced software or drown you in academic papers that read like they were written by a robot. Instead, I want to pull back the curtain and show you how these algorithms actually behave when they hit the real world. We’re going to strip away the marketing hype and look at the practical reality of how to balance light and shadow without turning your work into a muddy, over-saturated disaster. This is about actual results, not theoretical perfection.
Navigating High Dynamic Range Imaging Techniques
When you dive into the weeds of high dynamic range imaging techniques, you quickly realize that there isn’t a one-size-fits-all solution. The real battleground lies in the tension between local vs global tone mapping. Global approaches are the workhorses; they apply a single mathematical transformation to every pixel in the frame. They’re fast and predictable, which is great for real-time video, but they often struggle with “flatness” because they can’t distinguish between a bright sky and a bright lamp.
On the other hand, local operators act more like a sophisticated artist, looking at the neighbors of each pixel to make nuanced adjustments. This is where you get that incredible sense of depth and detail, but it comes with a catch: if you aren’t careful, you end up with unnatural halos around high-contrast edges. Navigating these luminance compression methods is essentially a balancing act. You’re trying to squeeze a massive amount of visual data through the narrow straw of display device constraints without losing the soul of the original scene.
Solving the Puzzle of Display Device Constraints

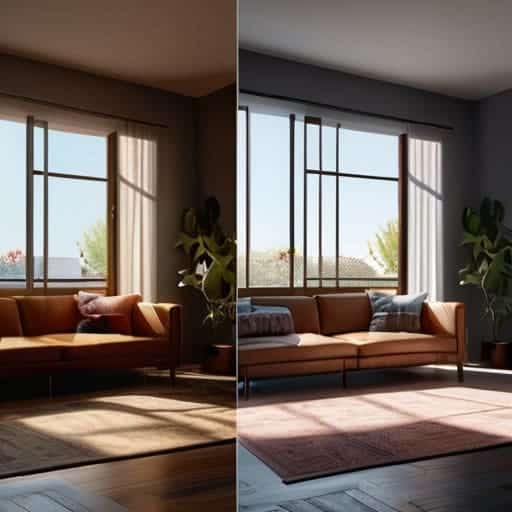
Here’s the reality check: even if you capture a scene with breathtaking detail, your hardware is likely going to let you down. Most consumer monitors and smartphone screens simply cannot replicate the sheer intensity of real-world light. We are essentially trying to squeeze a gallon of visual information into a pint-sized glass. This is where display device constraints become the ultimate bottleneck in the entire image processing pipeline. If we don’t bridge that gap, your stunning sunset will end up looking like a flat, washed-out gray smear.
To fix this, we have to get clever with how we redistribute brightness. We aren’t just turning down the lights; we’re performing a delicate balancing act. This often involves a tug-of-war between local vs global tone mapping approaches. While global methods apply a single mathematical curve to the whole image, local techniques look at individual pixel neighborhoods to preserve those tiny, crucial details. The goal is to achieve a sense of realism without making the image look “crunchy” or artificial, ensuring that the transition from bright skies to deep shadows feels natural to the human eye.
Pro-Tips for Mastering the Dynamic Range Dance
- Don’t go overboard with the local operators. It’s tempting to crank up the local contrast to make everything pop, but if you push it too far, you’ll end up with “halo artifacts” around your edges that look like a bad Photoshop filter from 2005.
- Mind the luminance-to-chrominance ratio. When you squeeze a massive range of brightness into a tiny display window, colors tend to desaturate or shift wildly. Always check if your algorithm is accidentally turning your vibrant sunset into a washed-out grey mess.
- Global vs. Local is your first big decision. Use global operators when you want a natural, photographic look that preserves the overall mood, but reach for local operators when you really need to pull detail out of those stubborn, deep shadows.
- Watch your computational budget. If you’re building something for real-time rendering or mobile devices, high-end edge-preserving bilateral filters might kill your frame rate. Sometimes a simpler, faster approximation is the smarter play for a smooth user experience.
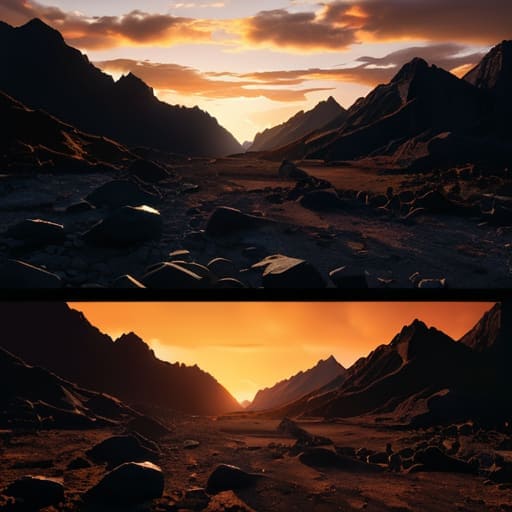
- Always test with “extreme” scenes. A tone mapper might look flawless on a standard landscape, but it’ll likely fall apart when faced with a high-contrast scene like a bright window in a dark room. Stress-test your math against the hardest lighting scenarios you can find.
The Bottom Line
Tone mapping isn’t just a technical checkbox; it’s the bridge that translates the massive, overwhelming data of the real world into something our limited screens can actually handle without losing the soul of the image.
There is no “perfect” algorithm—only trade-offs. Whether you prioritize preserving local contrast or avoiding that dreaded “halo” effect depends entirely on whether you’re aiming for hyper-real punch or cinematic subtlety.
Mastering these techniques means moving beyond simple brightness adjustments and learning to dance between the extremes of blown-out highlights and crushed shadows to find that sweet spot of visual clarity.
The Digital Alchemy
“Tone mapping isn’t just some math trick to squeeze data into a screen; it’s the art of deciding which details are worth saving and which ones have to die so the rest of the image can actually breathe.”
Writer
The Final Frame
At the end of the day, tone mapping isn’t just some math equation running in the background of your favorite photo editor; it is the bridge between the raw, chaotic data of a high dynamic range scene and the limited reality of our screens. We’ve looked at how we navigate the complexities of HDR imaging and how we dance around the physical constraints of our displays to keep images from looking washed out or overly crushed. Whether you are using global operators for that consistent, cinematic look or local operators to squeeze every bit of detail out of the shadows, the goal remains the same: preserving the soul of the original scene while working within the strict boundaries of our hardware. It is a delicate balancing act of preserving contrast while managing luminance.
As technology pushes further into the realms of micro-LEDs and even more expansive color gamuts, the algorithms we use will undoubtedly evolve, but the fundamental challenge will remain. We are constantly chasing that perfect, elusive representation of light that feels as real as the moment we actually lived it. Mastering these techniques allows you to stop fighting your gear and start commanding the light. So, the next time you see a breathtaking landscape that feels like it’s jumping off the screen, remember that there is a beautiful, complex symphony of tone mapping working tirelessly behind the scenes to make the impossible visible.
Frequently Asked Questions
Does applying heavy tone mapping ruin the natural "feel" or realism of a photograph?
Honestly? Yes, it absolutely can. There’s a fine line between “enhancing” a scene and turning it into a surrealist fever dream. When you crank the tone mapping too hard, you end up with that hyper-saturated, “crunchy” look where every shadow is unnaturally bright and the depth just vanishes. It stops looking like a window into a moment and starts looking like a CGI render. The goal is to guide the eye, not hijack it.
How do I choose between global and local tone mapping for a specific project?
It all comes down to the “vibe” of your project. If you’re aiming for a natural, cinematic look where the lighting feels cohesive and realistic, go with global tone mapping. It’s predictable and keeps things consistent. But, if you’re dealing with a high-contrast nightmare—like a dark interior with a blindingly bright window—you’ll need local tone mapping. It pulls detail out of the shadows and highlights simultaneously, even if it looks a bit more “processed.”
Can tone mapping algorithms actually recover detail in shots that were originally underexposed?
The short answer? Yes, but with a massive asterisk. Tone mapping isn’t magic; it’s a mathematical redistribution of light. If your underexposed shot has enough signal—meaning you didn’t just capture pure black noise—tone mapping can pull those hidden details out of the shadows. However, you’re essentially stretching a very small amount of data. You’ll get the detail back, but expect some grain and a loss of that crisp, clean look.